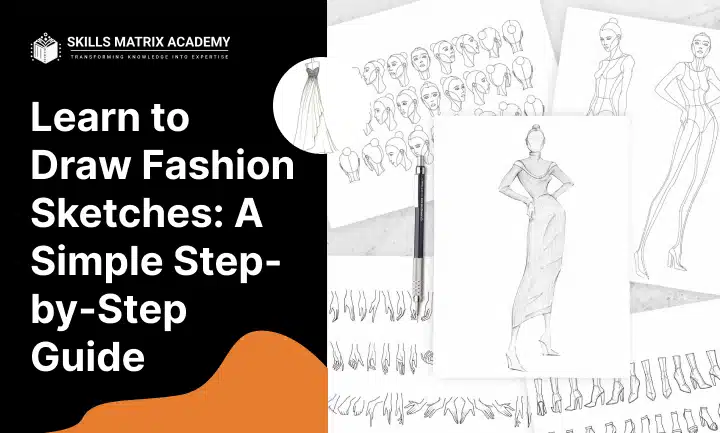
Every design begins with a sketch. A fashion sketch is the first step in bringing your fashion ideas to life. You can think of it as the blueprint for your design.
These fashion sketches don’t include a figure. Their main purpose is to communicate technical elements, like garment length and garment fit, to the viewer.
Fashion illustrations go beyond flat sketches by showing finer details. They include colour, texture, shading, and movement lines.
A fashion illustration is the art of drawing fashion concepts, sketching fashion concepts, or painting fashion concepts. It helps to visualize a garment before production begins. More than technical, it is a stylistic fashion illustration.
What Are Fashion Sketches?
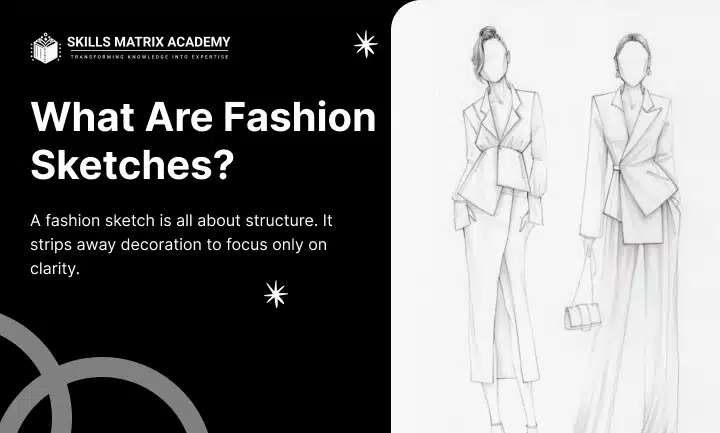
A fashion sketch is all about structure. It strips away decoration to focus only on clarity.
Key roles of fashion sketches:
●Show clear garment length.
●Define garment fit and shape.
●Serve as the blueprint for a design.
For example, a flat sketch gives manufacturers the exact details. No distractions. Just the technical plan.
Much like in a website design course or graphic design course, where you first create simple layouts before adding visuals, sketches lay the groundwork for the final product.
What Are Fashion Illustrations?
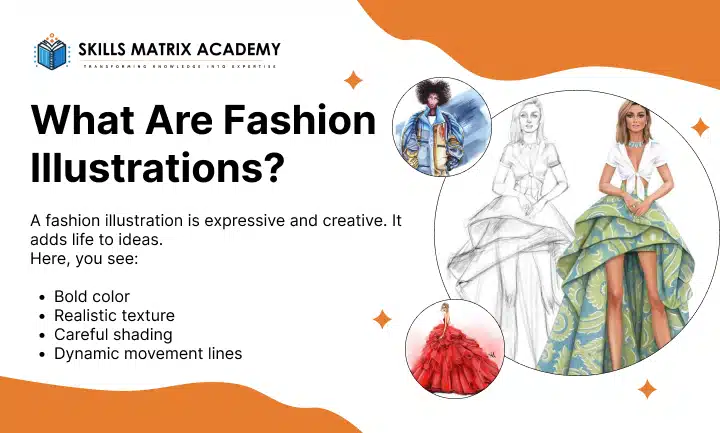
A fashion illustration is expressive and creative. It adds life to ideas.
Here, you see:
●Bold color
●Realistic texture
●Careful shading
●Dynamic movement lines
A fashion illustration does more than show clothing. It communicates style, energy, and personality. It allows designers and clients to visualize a garment as if it were already walking the runway.
How to Draw Fashion Sketches
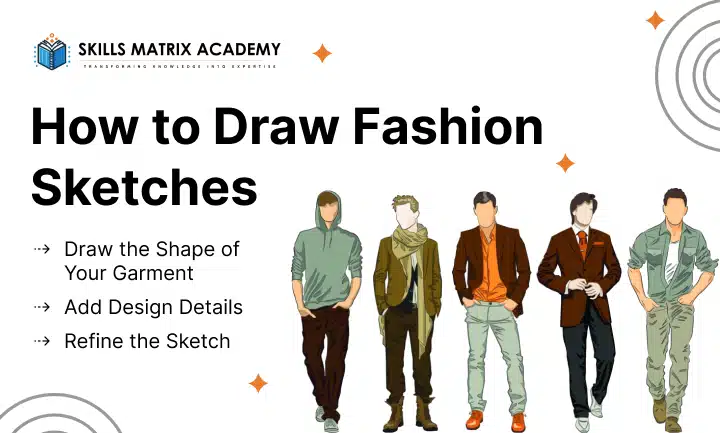
Learning how to draw fashion sketches is the first step in turning ideas into designs. A fashion sketch works like a guide, showing the shape of the garment and its details. Even beginners can create a flat fashion sketch by following a few simple steps.
Step 1: Draw the Shape of Your Garment
Start by focusing on the shape of the garment. This shape is also called the silhouette of a garment.
Ask yourself: Is it a fitted garment or an oversized garment? This choice changes the entire design.
Keep the outline simple. Don’t worry about details yet. The goal here is just to define the overall look.
A slim dress, for example, has a clean and narrow silhouette of garment. An oversized garment, like a loose coat, needs a wider shape. These decisions set the foundation for your sketch.
Step 2: Add Design Details
Once you have the shape, it’s time to bring it to life with design details.
Without these details, a garment doesn’t exist. They show function, style, and personality.
Some common design details include:
●Functional seams that hold the garment together.
●Decorative seams that add visual interest.
●Volume elements like pleats and frills.
●Fastenings such as buttons and zips.
●Neckline styles like round, V-neck, or boat necklines.
●Structural parts like the collar and pockets.
●Stitch details such as embroidery.
Each detail makes the design clearer. By adding these, you give the viewer a better idea of the final product.
Think of fashion sketches as communication. They explain your design so anyone—tailor, manufacturer, or client—can understand it.
Step 3: Refine the Sketch
The last step is to refine the sketch. Look at your drawing and clean it up. Erase any extra lines or messy outlines. In short, erase unnecessary lines to make the sketch clear and polished.
This step matters because clarity is everything in design. A refined fashion sketch shows confidence and precision.
How to Draw Fashion Illustrations
To master how to draw fashion illustrations, you need to learn the language of fashion design. This includes creating a 9-head figure, drawing your fashion figure on it, and rendering your design to show textile, texture, and print.
What You’ll Need
Before you start, gather your tools. A sketchbook is essential. It captures your ideas, inspirations, and design evolution. Studies show that a sketchbook helps boost creativity and idea development. This is especially important if you plan to launch your own clothing line.
Other essential tools include:
●Sketchbook
●Pencil
●Sharpener
●Eraser
●Pens
●Coloured pencils
●Markers
Step 1: Draw the Outline
Begin by lightly drawing your fashion figure. You can use a template or create one from scratch.
Part 1: Create Guidelines
1.Draw nine heads of equal shape and size. Label them one to nine. Leave space at the bottom for feet.
2.Add horizontal lines between each head.
Draw a broken line at head 1.5 and 4.25.
3.Label anatomy on your figure.
Part 2: Create the Skeleton
1.Draw the balance line, a vertical line perpendicular to the horizontal guidelines.
2.Add an oval for the head. Draw a horizontal line for shoulders, roughly two heads wide.
3.Draw a horizontal line for the hips, about one and a half to two heads wide.
4.Draw a horizontal line at the waist, keeping it close to the width of one head
5.Connect the shoulders, waist, and hips.
6.Draw a guideline for arms.
7.Add vertical lines from waist to ankle
8.Draw a cylinder for the neck.
9.Connect the neck to the shoulders.
10. Draw small ovals for knees and small ovals for ankles, slightly smaller than the knees.
Part 3: Create the Shape
1.For arms, draw ovals for the shoulders, biceps, and lower arm.
2.Draw ovals for upper and lower legs. Add triangles for feet.
3.Outline arms and legs using the ovals as guides
4.Shape the legs by following the ovals as guidelines
5.Add neckline, bustline, underwear line, and princess style line
6.Refine the figure. Mirror one side onto the other using the balance line.
Step 2: Dress the Figure
Now comes the fun part: dress the figure in your design. Start with an outline of your desired silhouette on the body.
Tip: If you feel stuck, refer to fashion trends inspiration for silhouettes, textiles, and colour ideas.
Step 3: Add Design Details
Adding design details transforms a basic shape into a full fashion illustration.
●Show how the garment drapes over the body.
●Include compression folds, wrinkles, and volume to indicate movement in the illustration.
●Clothing can be detailed clothing or simplistic clothing, depending on your style.
Focus on creating a unique design with every element. Once satisfied, outline the final figure with a fine liner and erase unnecessary process lines.
Step 4: Rendering
Rendering conveys the fabric, print, and colour choices of your design.
●Add shading to give a three-dimensional effect.
●Use a single medium or combine mediums like coloured pencils and markers.
●Experimenting with different mediums helps capture texture, colour, and prints accurately.
A well-rendered fashion illustration communicates both design and style clearly.
Step 5: Determine Your Signature Style
As a beginner, I study other illustrators. Eventually, develop your own signature style.
Consider:
●Do you prefer paint, coloured pencils, or black and white illustration?
●How do you illustrate the face of the figure?
●What types of clothing design do you focus on?
Experiment with drawing techniques and rendering mediums. Small details together create a distinct style that is uniquely yours.
What is a Fashion Croquis?
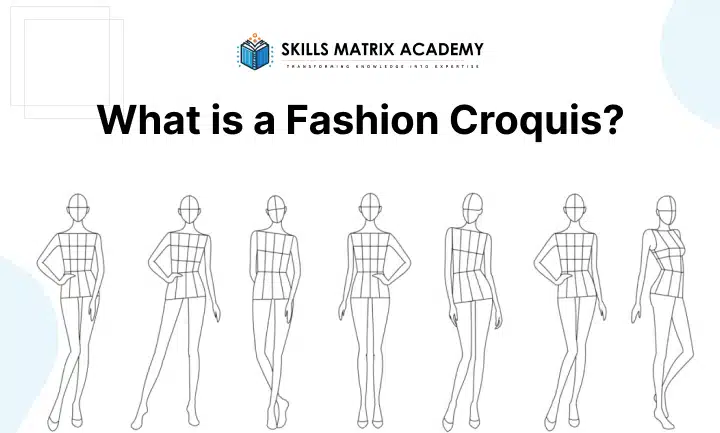
A croquis is a drawing of a fashion model that you trace over to design clothing. You can also call it a fashion figure or fashion template.
Fashion croquis come in different shapes, sizes, and styles. The choice depends on the design purpose and the demographic you are designing for. I’ve used different croquis throughout my career. Some were stylized croquis, while others were simple croquis.
Learning a graphic design course or a website design course can help you understand proportions, layouts, and visual presentation, skills that improve your fashion template designs.
What are the Proportions of a Fashion Croquis?
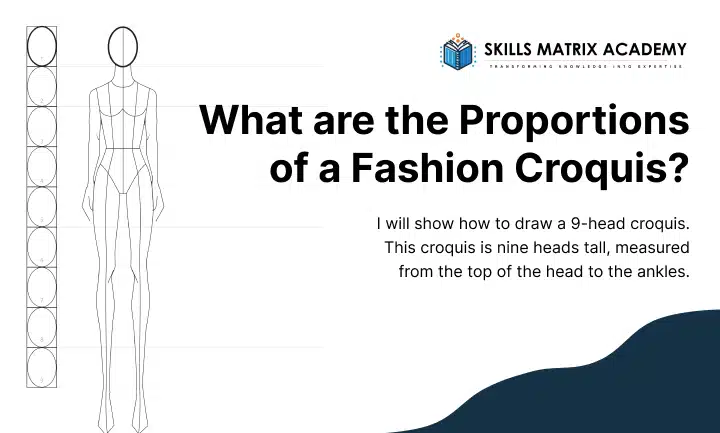
I will show how to draw a 9-head croquis. This croquis is nine heads tall, measured from the top of the head to the ankles. It is much taller than the average woman.
Note: The feet are excluded because height can vary with shoe height and heel height.
A 9 heads tall model exaggerates proportions. This creates an elongated model that shows clothes in a dramatic scale. Skills learned in a graphic design course or website design course can help you balance proportions and visual appeal in your sketches.
Adapting Proportions
Fashion models should have diverse body proportions. You can evolve croquis to be any shape and size.
This tutorial teaches the 9-head croquis method, used in fashion colleges. Later, you can adjust the proportions to fit your target demographic.
Taking a graphic design course or a website design course can improve your understanding of layouts, scaling, and visual hierarchy, making your fashion croquis more effective.

Bharat Arora
12+ years as a web developer, Bharat has worked in the biggest IT companies in the world. He loves to share his experience in web development.


Bharat Arora
12+ years as a web developer, Bharat has worked in the biggest IT companies in the world. He loves to share his experience in web development.